There are several factors that influence the quality and performance of water based polyurethane and water based lacquer film finishes, including:
Surface preparation…
Finishing products…
Application equipment…
Environment (temperature & relative humidity)…
And of course, knowledge and technique.
An important part of knowledge and technique is knowing and applying the optimal thickness of finish to each coat, and the total thickness of all coats combined. .
In Part 1 of this article, I will explain what wet film thickness is, why it is important to achieving a good performing finish, and how to measure it. In Part 2, I’ll cover dry film thickness.
What Exactly is Wet Film Thickness?
Simply stated, it’s the thickness of a coating, pigmented or clear, measured right after application and prior to any drying taking place.
Why is Film Thickness Important?
Wood finish manufacturers engineer their products to meet specific objectives, and because each product has its own variety and percentages of materials in its mixture (as well as how they are brought together) each behaves and performs in a unique way.
Consequently, each product will have its own application guidance, which includes the specified thickness for each coat. They will also specify the total thickness to meet their performance targets for that finish. Depending on the type of resin and solvent chemistry used in the formula, the manufacturer may specify a wet film thickness ranging from a fine 1mil tack coat upwards to a heavy 6mils.
Keep in mind, too, finishes flow out best at a specific thickness.
A coat that is too thin won’t level out properly and will have a rough texture to it. Conversely, if it’s too thick, it won’t dry correctly, will entrap air bubbles, and it may run.
And in the case of certain water-based wood coatings, it may exhibit a blueish or whiteish haze.
For these reasons, it is important that the optimal level of thickness is applied for each coat, over the entire area.
What is the Optimal Wet Film Thickness?
You can usually find the finish manufacturer’s recommended thickness for each product on their website’s tech data sheet.
As an example, looking at the tech data sheet for Target Coatings EM6000 production lacquer, if you scroll down to “Application on Unfinished/New Wood,” you’ll see it recommends applying “2 – 4 mils per wet coat”. (A mil is 1/1000 of an inch, or .001”)
Measuring Wet Film Thickness
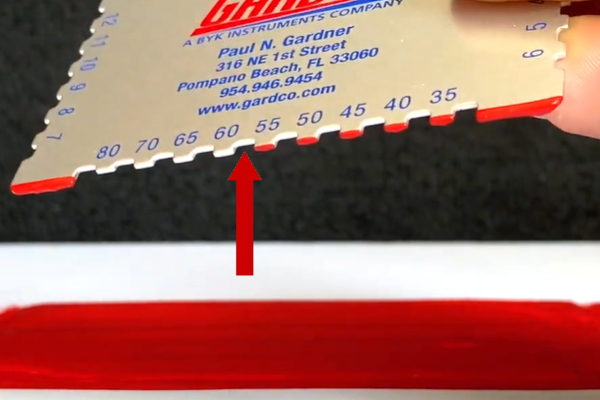
To measure wet film thickness, you can use a wet film gage, or “comb” as it’s often referred to.
Find the edge of the gage with the range you’re measuring (1 – 6 mils for most wood finishes).
Right after spraying a coat, place that edge of your gage perpendicular to and touching the substrate. This can be done either on a test panel, or in an inconspicuous area of your piece.
Hold it in position and wait a few seconds until the teeth are wet.
Then, remove the gage from the film and look at the teeth. The wet film thickness lies between the largest value that is “coated” (wet) and the smallest value that is “uncoated” (dry).
Here’s a tip when measuring clear finishes: it can be difficult to see any difference between wet and dry teeth, so, after touching the gauge to your work or test panel, scrape the gauge an inch or two along the surface and see which notches make a trough in the finish. You can remove the gage marks by lightly spraying a second, thin wet coat over the gage test marks – melting the coats together.
To maintain its accuracy, be sure to clean off your gauge with the appropriate solvent (use tap water for water based products) as soon as you are finished taking a reading.
Bellow is an excellent video explaining wet film thickness gauges and how to use them…
I hope the information above was helpful.
In Part 2, I’ll cover dry film thickness and how to accurately calculate it.
In the meantime, do you have any questions on wet film thickness, how to measure it, manufacturer guidelines, etc?
Please share your thoughts or read what others are saying in the comments section below.
Marty Schlosser has nearly 50 years experience as a furniture designer, maker, and finisher, including a career in production-level spray finishing. Often called, “the industry’s go to expert,” Marty is a past-president of the Ottawa Woodworkers Association (and a proud recipient of their Danny Proulx Memorial Award), and the founding member of Kingston Wood Artisans, a local woodworking club in Kingston, Ontario, Canada where he and his wife reside.

One caveat that I think needs to be mentioned is that comb-type flatness gauges of the sort you show are only accurate when the part of the substrate is very flat and when the gauge itself is kept clean. Even a seemingly small amount of curvature can create multi-mil errors with those business-card-sized gauges. Same for accumulations under the “end fingers”, that establish “zero”. One obvious way to avoid the curvature issue is to pick spots to measure in advance that are flat and that aren’t expected to warp as a result of the moisture from the finish etc. Also when you get an unexpected reading, make sure to check the surface before acting on it.
Another option is to get a less susceptible type of gauge, of which I’ve had good experiences with two: Gardco makes a “dual Nordson type” gauge that works on the same principles as the comb-type ones you show, but with much smaller baselines, i.e. the “comb” covers a much narrower strip of the substrate and therefore “sees” less deviation. It doesn’t measure as high as the business card ones you show, but it does read in half-mils through the range of typical clearcoat thicknesses up to 4 mils, and its ~2x shorter baseline makes it ~4x less vulnerable to curvature (i.e. 1/4 the error for any given amount of surface curvature). The Gardo dual Nordson gauge costs about $70 online. I use a pair of these (I like to have a backup) for almost all of my work, though I have a stack of “credit card” gauges that I loan to friends etc.
Better still is a roller-type gauge, in which an eccentric wheel is sandwiched between 2 circular rollers, such that the wheel’s distance from the substrate varies as the gauge is rolled. While this works on the same physical principle as a comb (a line between the 2 circular rollers establishes a zero plane, while the middle wheel measures distance/thickness from that), the “baseline” is very short, so this type is basically insensitive to surface flatness. The catches are that they take some skill to use properly. You have to start at the highest position and then roll the gauge along the surface until the eccentric wheel makes contact with the coating, and note the point where that happens. Perhaps more imporant they’re finely machined and therefore really expensive. The Elcometer that I use for critical work or problem substrates was upwards of $300, and even the “offshore knock-offs” are half that.
Patrick, thank you for bringing up the issue of gauging work that may be warped or designed with undulating or curved surfaces, as well as highlighting alternative gauge types.
I also liked that you emphasized the point I made about cleaning the gauge immediately after use to maintain its accuracy.
Marty
Marty and Patrick, thanks to both of you for the tips. I’m a relative novice at this, and have struggled with some of the issues mentioned in the article. The only thing I refinish, however, is gun stocks, which in nearly all cases don’t have any flat planes, so Patrick’s tips on the Gardco and roller gauges was especially helpful. It seems a bit like “Monday morning quarterbacking”, as I have found there’s not much you can do in the way of corrective measures once a wet coat has been applied, but I can see it would be a help in applying the next coats, as spray volume and the speed of your pass can be adjusted to compensate.
There’s a lot to be said for practicing on test pieces and getting your gun settings and technique, dilutions, etc nailed down ahead of time so that you can hit your thickness etc targets right the first time when you need to. I try to discipline myself to run, say, 4-6 12×12″ test panels each week with fairly complete coating stacks (stain, tie/seal, maybe fill, tone, topcoat, rub – maybe 8-12 coats total for each panel). That lets me try out new techniques or finishes at a reasonable rate, without demanding completely insane time investments or undue risk to my “real” projects (though my spouse still looks at my pile of test panels and notes that go with each of them and just sighs).
That was also what saved me with the recent EM9300 recall – I saw the cratering in a series of test pieces that I was running for something else before it messed up anything I cared about.
As you say, if you’re gauging on deliverable work then it’s probably too late. Among other things, _all_ of the wet-film gauge types we’ve mentioned leave tracks to at least some degree (with rollers being the worst offenders), so if you do that to a workpiece then you’re just creating more coats/sanding for yourself.
Patrick – Your suggestion that gages leave tracks in deliverable work is misleading from the standpoint that when the gage is removed from the wet film the finisher can/should quickly shoot a tack-coat of the finish onto the area where the thickness test took place to remove the defect. This is a very common practice and a standard psychomotor skill for professional finishers. There is no practical reason not to occasionally test the thickness of your application while in the middle of a production run.
-JW-
Thank you for the pointer!
As you know I’m not a pro. I had tried shooting tack coats over gauge tracks, but even so I’d had trouble completely concealing the tracks. As you say, I just don’t have the reps to do it perfectly.
The way I test in the middle of a run is to keep a running storyboard in parallel with the actual work, and gauge on that. Probably horribly crude by pro standards, but it avoids a lot of tears.