
“To Fill or Not to Fill… That is the Question.” This article walks you through how to work with grain filler.
When I was making furniture for a living, nearly every one of my clients had their own idea of what constituted “finely finished” furniture. That enabled (or should I say “forced”) me to develop a wide lexicon of finishes to meet their diverse tastes. Today I’d like to address one particularly important aspect of finishing, and that’s how to deal with open grained (AKA open pored) woods like oak, mahogany, walnut and butternut.
There are two principal choices finishers have for working with such surfaces: leave the grain pores open or fill them.
Although there is simply no right nor wrong answer to this question – as it all comes down to client choice – one fact remains: if you need the open grained wood to have a perfectly smooth surface, you have no choice other than to fill the pores. And although some fill the pores by spraying several extra coats of finish and sand between each and every one of them, there’s a much more efficient way: use a grain filler.
Although there are several different grain fillers on the market, ensure you choose one that is fully compatible with the other finishing products (sealer, colorants, topcoats, etc.) you’ll be using on the piece.
I prefer all my finishing products to come from the same manufacturer so this will never be a problem for me. But if yours come from different manufacturers, run a few test panels just to be sure.
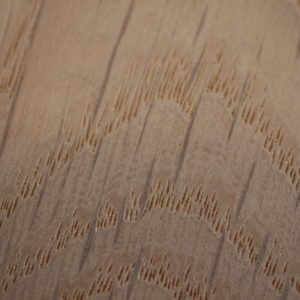
I have found Target Coatings HSF5000 series of grain fillers gives me consistent, exceptional results. And because they’re water-based, they dry quickly.
For those clients who prefer to see the wood grain, I use HSF5100, which imparts a neutral, translucent color to my work. The two other fillers in the Target Coatings line are for surfaces that will be painted or receive tinted lacquer: White base HSF5200 for light colors and Grey base HSF5300 for darker colors. And to save time and money you can tint these products so they’ll also act as primer.
HOW TO FILL PIECES THAT WILL BE CLEAR FINISHED
Fillers are used on all open grained woods regardless of what type of finish is desired: stain, paint, tinted lacquer, or clear (also known as “bright”). Clear finished pieces are the simplest to describe, so let’s start with them. But rest assured, this article will also touch upon how to fill pieces using those other finishes.
Seal the Wood: Before applying pore filler, lightly seal the entire surface. This will help keep the rest of the surface from taking on any of the filler’s color. I prefer Target Coatings EM1000 Sanding Sealer reduced 50% with water* for this job. It also does a great job of sealing the wood to get it ready to accept whatever other products I’ll be applying, but by adding dyes or UTC (Universal Tinting Colorants), it can also do double-duty as a toning medium. How’s that for flexibility?!
Ensure you thoroughly sand the surface down to P220 grit sandpaper before applying the sanding sealer. After the first coat, sand the surface again with the same grit sandpaper. This will get rid of those “whiskers” that show themselves as the grain is raised. Follow this up with a second coat of sanding filler, but don’t sand this last sanding sealer coat.
Special Effects: Whereas many like the neutral/translucent color that the HSF5100 Neutral Filler base imparts to open grained woods, some prefer them to color contrast. This can be achieved simply by tinting the filler with water-soluble dyes and/or pigments. Conversely, others want those open grain areas to take on the same color as the rest of the wood. Again, the objective here is to meet your or your client’s desires, be they neutral, contrasting, or alike. Target Coatings HSF5000 series fillers allow you to achieve this.
Applying Filler: All Target Coatings HSF5000 fillers can be either sprayed, brush or roll applied, but I prefer to spray it on. Although it’s a relatively high viscosity product, I’ve found that when spraying HSF5100 (the neutral filler base version), which is what I use on clear finished pieces, a 1.3mm needle/nozzle/air cap set on my Fuji Spray T75G HVLP turbine powered spray gun works quite well. But if you’re wanting to spray the higher viscosity white or grey base primer versions, you’d best use a 1.8mm set. For those who prefer to use compressed-air HVLP spray guns such as Fuji Spray’s LX-20, move up to the next higher needle/nozzle/air cap set (e.g. 1.4mm for HSF5100). Regardless of the set you mount, apply a 2 – 3 mil wet film thickness per coat. Two coats are fine for all but the most heavily pored woods, as they usually require an additional one or two more coats.
Drying Time and Sanding: Allow at least 2 hours drying time between grain filler coats to ensure it has dried enough to sand properly. Sand after each coat with P320 grit sandpaper but don’t press too hard or you’ll run the risk of removing too much of the filler from the open pores.
Lock in your Filler: Once I’ve achieved the smooth surface look I’m aiming for, I lock it in with another coat of Target Coatings EM1000 Sanding Sealer, again – reduced 1:1 with water (50% reduction*) before proceeding with whatever topcoat product I’ve chosen. Again, I choose Target Coatings sanding sealer because I know it will be compatible with their HSF5000 series grain filler.
FILLING PIECES THAT WILL BE STAINED, PAINTED OR HAVE TINTED LACQUERED APPLIED
I mentioned at the beginning of this blog that I would also address pore filling pieces that will be either stained or have paint or tinted lacquer applied, so before moving on to top coating, let’s cover them now.
Stained Work: Start by staining your piece in the manner you usually follow for closed-grained woods. Once the stain has properly dried, ask yourself whether you want the open grain pores to be the same or a contrasting color to that which the stain imparted. Again, remember that if left un-tinted, the HSF5100 neutral filler base will impart virtually no color to the pores. If you want any other color, follow the advice I gave in the “Special Effects” paragraph above, and follow that up with the afore-mentioned EM1000 sanding sealer to lock everything in and prepare it for top coating. But be careful not to sand all the way through the sanding sealer to the stained surface; hand sanding rather than using sanding machines is the safest way to go.
Painted or Tinted Lacquer Work: Once you’ve applied the sanding sealer coats as described above, choose your grain filler. With Target Coatings, that will be either HSF5200 for colors in the lighter end of the spectrum or HSF5300 for the darker colors. Tint the grain filler with the appropriate water-friendly tinting product of your choice. Go ahead and apply the tinted filler in the same manner described above for clear finishes. Once the necessary coats of paint or tinted lacquer have been applied, depending on those products, you may or may not have to move on to applying a topcoat. If top coating is desired, proceed with top coating.
TOP COATING
Now that you’ve gone to all that effort to fill your open grained furniture or cabinet piece, it’s now ready to be top coated with the product of your (or your client’s) choice. Rest assured that Target Coatings has a complete range of quality products to meet those needs. Check them out at: https://www.targetcoatings.com/shop/
I hope that I’ve given you some great ideas on how to deal with open grained woods. Please let me know what you think as I’d love to hear from you regarding this topic, or any other finishing challenge.
*Note from the Editor: It is recommended on the Target Coatings website that the EM1000 Universal Sanding is NOT used under the HSF5000 Primer/Surfacer or the EM6500 Pigmented Lacquer Series. However, we have learned that by reducing the EM1000 with water 50% (1:1) and by applying the reduced EM1000 in coats not exceeding 2mils wet, followed by a thorough sanding with P320 sandpaper, a quality preseal can be obtained to create the grain-filling properties that are described in this blog post. We strongly recommend that you make a test/storyboard on the wood species being used to confirm your process before proceeding to the final finishing schedule.
Marty Schlosser has nearly 50 years experience as a furniture designer, maker, and finisher, including a career in production-level spray finishing. Often called, “the industry’s go to expert,” Marty is a past-president of the Ottawa Woodworkers Association (and a proud recipient of their Danny Proulx Memorial Award), and the founding member of Kingston Wood Artisans, a local woodworking club in Kingston, Ontario, Canada where he and his wife reside.

This is probably a silly question, but…
When using HSF5000 as a filler as described here, I assume that the excess must be squeegeed or wiped off of the sealed surface after each sprayed coat. If so, how long should we wait to do that after applying the coat? In other words, is this like “brand AC” where you remove it right away after applying, or like an oil-based filler like “brand PoP” where you wait for the finish to dry a bit before taking up the excess?
Part of my reason for asking is that the HSF5100 neutral filler is about 50% solids, so I wonder how you could get reasonably complete filling in 2 coats without waiting a little bit before wiping?
I’m already using the white HSF5000 as a rough-surface primer/filler, and agree that it sprays surprisingly well with a sufficiently powerful gun. I’ve had good luck with a CA Jaguar 100H with 1095 cap (22.5 cfm @ 50 psi), 1.7 mm orifice and pressure-fed cup. The Q5/T75G combo sputters more but it levels well enough that the final results look good.
Patrick, thanks for posing this question, as it’s an important one.
Waiting time after application. As mentioned in my article, wait until the coat has dried before sanding (not wiping). This usually takes two hours for the first coat, after which you can go ahead and sand it back. You will notice that I also said nothing about wiping (or squeegeeing) at an angle to the grain shortly after the product has set up, as some fillers require. Simply explained, the viscosity of this product is lower than those particular fillers, hence you need to leave it alone to dry. The residual amount left on the surface will be removed by sanding.
Glad to hear that you’re happy with that one spray gun.
Please let us know how everything works out for you.
All the best for the festive seasons to you, and good health for 2022.
Marty
One more question: On the product page for EM1000 it says “NOTE: DO NOT USE EM1000 Universal Sanding Sealer underneath Emtech HSF5000 Primers or EM6500 and EM6600 Pigmented Lacquers”, which is obviously exactly what you’re doing here.
Does that warning only apply to the pigmented primers (which seems likely given that it also specifically includes the pigmented lacquer), os does the fact that you’re running very thin coats (50/50 dilution) play a role?
Patrick, as was highlighted in the Editorial comments shown at the end of my article), heavily diluted EM1000 can indeed be used under these products – but only if the extra precautions stated there are closely followed. It is not merely a question of thinning with water, although that does play an important role in the process.
Can I use your retarder SA5 and the Crosslinker CL100 together with EV8000
Sal – Thank you for your inquiry. Yes, you can use both of these additives in the EM8000cv, as well as in any of the Emtech top coat finishes.
I recommend adding the CL100 first, using whatever percentage you decide to work with (between 3-5%). Once the CL100 is thoroughly mixed into the resin you can then add the SA5 Retarder. Blend the retarder and allow the entire package rest and synergize for at least 60 minutes before you use it.
-JW-
Oh, no waiting between the CL100 and SA5? Thats good to know.
Hi Marty/Jeff,
I only have an Earlex 5500 HVLP i think its a 2 stage turbine. I tried spraying the HSF 5100 with, both a 1.5mm and 2.0mm needle and found it was too thick for my gun, it spit out thick droplets. I dont think the tubine has enough power for a coating this thick. Is it possible to thin the 5100 with SA5 or distilled water and just apply more coats?
Thanks,
Brian
Brian – Yes, you can thin the HSG5000 with basic tap water upwards to 50%, however, I recommend starting at 5% by liquid volume and determine how it improves the flow and leveling before you move up the percentage ladder. FYI – I have never reduced HSF5000 more than 10%lv to obtain good flow/leveling when using an underpowered turbine system.
-JW-
for – Painted or Tinted Lacquer Work, do I seal again after applying the grain filler?
Justine – No. Once the HSG5000 Grain Filler is applied and level sanded you should go directly to your color coats. Do NOT use EM1000 as a sealer over the HSF5000 or under the EM6500 Pigmented Lacquer. Do so will create a very obvious crackle effect.
-JeffW-
after gran filling on a stained piece and sanding back, do i have to do the 50/50 sealer or can i just do 2 coats of full strength sealer before applying top coat?
Justine –
Depending on the species being finished I tend to use a wash-coat of EM1000 to lock-in the grain filler. Reduce the EM1000 with water by 25-30% to lower to resin solids. One coat should suffice, but make a storyboard to confirm your process.
-JeffW-
I am planning on making kitchen cabinets for my home with a l medium to light grey pigmented lacquer. Can I use the hsf 5000 directly to any subtract or should I seal the subtract first. I’m using either birch plywood or MDO plywood for the cases, mdf for the panels and soft maple for the frames. I have been suggested not to use em 1000
Secondly.. is the final coat of em 6500 going to give me a smooth satin finish or should I seal it with something as a final topcoat.
What would be the best schedule for hsf 5000 and em 6500 to obtain the look I’m after. Thanks in advance.
Dave – You can use the HSF5000 Primer/Surface as your prime/base coat on MDO, MDF, birch, maple and poplar substrates. We suggest a minimum of 2 coats at 2-3mils wet per coat, with a light scuff-sanding between coats with 400-grit AO paper, followed by a light water/alcohol wipe-down at 1:1. DO NOT use EM1000 in conjunction with HSF5000 and/or EM6500.Once you have primed/sealed to your satisfaction you need to apply a minimum of 2 coats of the EM6500 color coats to obtain good hiding and color continuity. I prefer three coats. Lastly, you may want to consider applying one or two coats of EM7000HBL Clear Lacquer as a candy-coat over the color coat to create more resilient shell or if you want to adjust the sheen.
-JeffW-
Very informative! I’m fairly new to spraying with HVLP and have been using an older 4-stage Apollo turbine. Getting better with almost every job using Target Coatings.
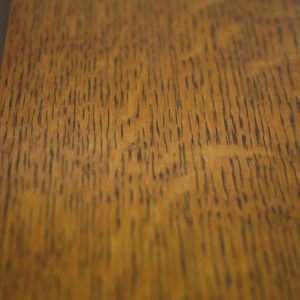
As I was reading and scrolling down, I came to the picture of the HSF5100 on oak…stopped me in my tracks. That is almost exactly the color and sheen of the Craftsman style cabinets that were already in our kitchen when we bought the house. I was wondering if you could/would share the “recipe” for that finish. I would like to install matching window and door trim and base….possibly crown or cove on the walls. The cabinet company that made ours won’t talk. 😉
Thank you, and keep the great content coming.
Hi Karl,
Thanks for your feedback. It’s great to hear about your success using Target Coatings finishes.
We had to dig a little deep into our records to find our finishing schedule for that sample. We have several samples finished with the same process so we picked the most likely candidate. The finishing schedule would be an application of 2 coats of our HSF5000 Neutral tint worked into the wood grain. After the grain filler dries you would sand level to the surface. We think the color is Dark Mission Oak from our NR4000 Stains. The topcoat was the EM8000 Conversion Varnish. Please remember this sample was created several years ago and age of coating can make things look a bit different as well as color being different on your computer monitor. We highly recommend you make a sample to be sure you can create the exact color you want. You could always start with a lighter stain and add your own dye or tint to create the perfect match.
Thanks again for your kind comments and good luck!
-Seth Kline