You’ve heard me say the No. 1 rule of wood finishing is to “take your time.”
It’s true — there are certain things you simply can’t rush.
But being efficient is not the same as “rushing,” and there ARE ways you can get more done in less time.
While visiting the shops of some of the top wood finishers in the business, I’ve made mental notes of some of the time-saving things they do.
Here are a few of my favorites and I’d love to hear yours, too…
Make a Storyboard
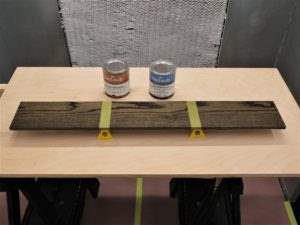
Yes, I’ve said it before, but I’ll say it again: one of the best ways to develop, dial-in and obtain approval for the “finished look” (and therefore avoid time-draining problems) is to make a storyboard with the various coatings and sequences you plan to use.
Start by selecting actual pieces of the substrate you are finishing – plan to invest in a few extra lengths of the actual and best grade of wood being used so you will know EXACTLY how it responds to the application of the finishes.
Depending on the type of final finish the you or the customer is looking for, you will either mask-off sections and/or make identical panels to confirm the substrate preparation, color application (be it a wood stain or pigmented finish) and the number of coats of the clear finish that has been selected to create the final effect.
Learning how all these elements interact will save you a tremendous amount of time and money when it becomes show-time!
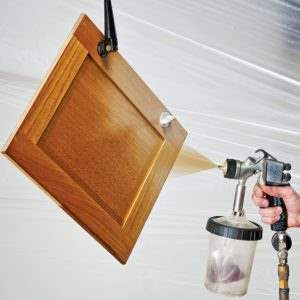
Finish, then Assemble
If you’re working on a large project with lots of components, it is best to stage the finishing process in batches, then assemble. Yes, some parts need to be assembled prior to applying the final finish – this is where you can apply your stain or ground colors prior to the last stage of topcoat and cure cycle. Staging keeps your finishing area less cluttered and parts can flow easily through the process.
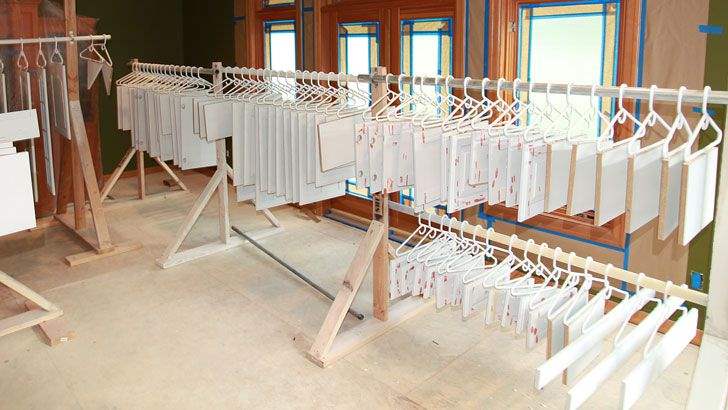
Finish Upright vs. Laying Flat
Like the above tip, this won’t work in all situations, but if you can hang your pieces on a spray rack you can finish more sides at the same time rather than laying flat, waiting to dry, then flipping. For example, you can attach temporary hooks or hangers to the hinge pocket when finishing cabinet doors – which are then suspended from the spray rack. Large surfaces can be mounted to a rotating jig that allows you turn and flip the piece during the finish application. Best of all you can move the multi-piece batch into the dry/cure area in one motion!
Use Water-Based Coatings
I’m obviously biased here, but there’s no denying that water-based products dry fast and can therefore greatly reduce the time between applications. With water-based products you can often move to the next finishing step within an hour, and best of all your clean-up is simpler and less toxic.
What are your favorite time-savers? Please share your thoughts or read what others are saying below in the comments.
When I finish doors I put them on frames that I made out of scrap wood that have drywall screws screwed through the wood. I finish the back,flip the door over spray the edges than the face. Put the frame on a rack. No sags drips or runs. The last coat lays out so flat you would think that it came out of a furniture factory. I have done thousands of doors this way. Much better than hanging.
Excellent advice. Thank you!
-JW-
Frameless cabinet panels and shelves with solid wood nosing can be stacked for spraying; I’ll shoot as many as twenty or thirty shelf edges at one time. It is sometimes fastest to finish shelves as longer parts, then cut to final length. It’s good practise to dry out your finishing room between coats, as the relative humidity can climb with WB finishes and slow subsequent coats. Also helps to boost workpieces off of their supports so a damp microenvironment doesn’t develop around them. I use triangular stickers atop corrugated cardboard, change out cardboard when it becomes glossy & slow to dry.
We shoot our seal & first build coats, typically gloss EmTech6000, then pull & set aside. They scuff sand better the longer you let them harden. Then seal the next batch while prepping the one after that. Once the seal coats are sprayed, we return to the first parts, de-whisker, and shoot last build coats and finish coat (typically 9300 Urethane/Polycarb). It’s really useful here to have two HVLP guns so you have the correct product at the ready.
To expedite scuff sanding between coats, sanding sponges (especially the thin 4×5″ ones, 180-220 grit) have turned out to be excellent products. They don’t clog like many sandpapers do. Then a 3M maroon and/or grey Scotchbrite pad on a half or quarter sheet sander creates a beautiful, uniform prepared surface FAST.
Bob — Thank you for sharing your procedures with us. You have provided good info over the years and I greatly appreciate your continued support. Your comment is well noted.
–JW–
Very helpful information. I’m interested in the choice between using EM 9300 vs. EM 8000cv for the finish coat on interior cabinetry.
Tom – EM8000 and EM9300 share similar levels of durability when compared for interior use. EM9300 offers better UV resistance, whereas the EM8000 color-shifts over time due to its alkyd backbone.
-JW-