
You have probably noticed the trending popularity of the “natural wood look” or “raw wood finish,” where the final result is a beautiful piece of furniture that looks as if it is raw wood without a single coat of finish.
The challenge is, even an ultra-clear coating or lacquer on light woods can add a “wet” look to your project that shows the appearance of the finish on it.
So, what if you want that raw, natural wood look, but you ALSO want your project to have a water, chemical and scratch resistant finish on it?
I’ve had success using Target Coatings’ Emtech® EM1000 Universal Sanding Sealer to create a base coat that helps achieve this natural wood look.
The EM1000’s ultra-clear and deep penetrating formulation helps you easily and effectively brighten your wood substrate WITHOUT creating an overabundance of haziness in the finished project.
Below are suggestions and tips to help you create this base coat and natural look finish. I’ll also provide pictures of some samples I fabricated in my shop to show side by side comparisons of different techniques.
In Part 1 of this 3-part series, I’ll share more about the challenge — and the overall process — of creating the natural wood look.
In Part 2 (below), I’ll share the “5 Steps” and specifics and details for each step…
And in Part 3 (coming soon), I’ll share examples of what my final results and sample boards look like.
So, let’s dive right in…
Part 1: The Challenge and Process of Achieving a Natural Wood Look
What is the Challenge of a Natural Wood Finish?
I first encountered a request for a natural wood look a few years ago when my wood shop partner asked me if I could make the solid maple furniture bookshelf I was building look as if it was unfinished.
I’ve always loved the appearance of a very clear finish, but all finishes will darken your substrate in some way — some finishes more than others. Even an ultra clear finish darkens the wood slightly giving it a wet look.
Since I love a challenge, I really gave it some thought and decided if I could whiten the finish a little, this would brighten the wood and counteract the wet look.
At the time, I had some glossy white enamel in my shop, so I just added a small amount of this paint to Target Coatings EM1000 Universal Sanding Sealer and, after a lot of stirring and then straining through an ultra fine mesh, I had a sealer coat that would ultimately lead to creating a process in our shop that was applied on quite a few different pieces of furniture of different wood species.
In most cases, this is a final look where you’ll want to do some of your own experimentation, but I hope to provide some basic guidelines to get you started on the path to creating the formula that works for you.
What is the Process to Achieve a Natural Wood Finish?
The process is simple enough — you want to apply a small amount of white tint to your first and possibly second coats to brighten the wood. However, there’s a delicate balance to the process since you want enough white to brighten your substrate, but not so much white that you begin to see a white haze (although some people like that look as well.)
In Part 2 of this post, we will explore some possible combinations and sheens that will give you multiple options and set you on the path of creating the process that works for you.
I will be working with two popular white Tints on the market: Golden Fluid Titanium White and Mixol Oxide White #25…
We will explore grain filling or no grain filling…
And finally, we will briefly discuss the differences between a Satin, Flat and an Ultra-Flat finish.
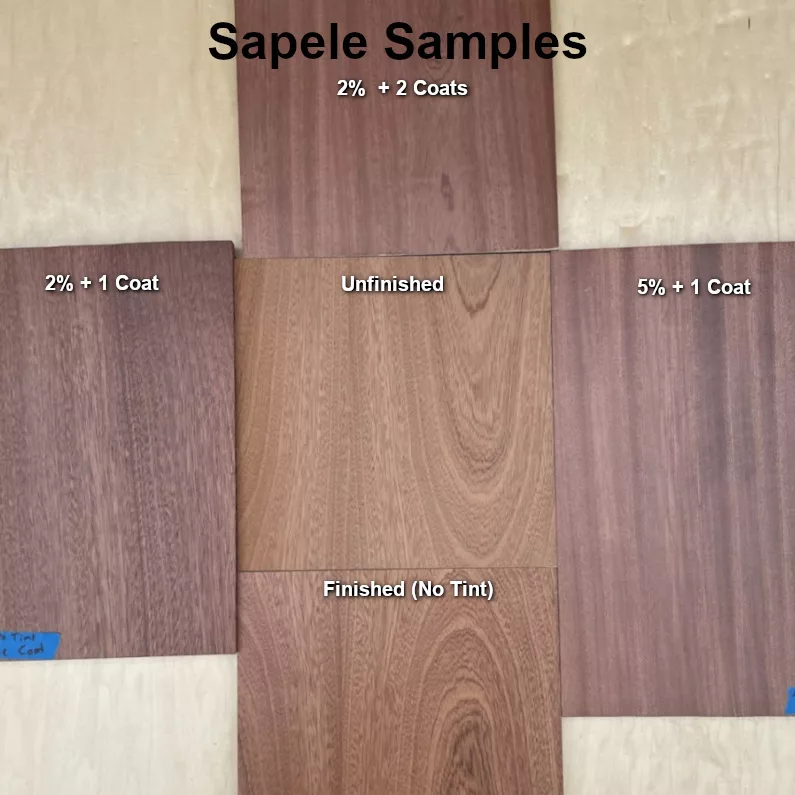
I’ll provide pictures of samples on what I think are the two most popular woods, White Oak and Maple, but this process can work on any lighter wood like Birch, Hickory, Ash, etc. Woods with darker grain or heartwood can be a little trickier because they will reflect the white more. I’ve included a sample of Sapele to illustrate this a little better.
There will be some people who like this look on darker woods so you’ll need to create some of your own samples and fine tune the process to achieve the results you’re looking for.
PART 2: “The Five Steps” to Achieving a Natural Wood Look
Step 1: Best Sanding Technique for a Natural Wood Finish
I’m going to start with some basic prep for all my samples or projects. Since we will be going for a natural, unfinished wood look, excessive sanding is not necessary for this technique. In fact, less sanding will work in your favor to absorb the first coats of brightened sealer.
I like to sand to 180G and then I’ll vacuum down my project with a brush connected to my shop vac. I don’t bother wiping down with a 1:1 water and denatured alcohol mixture to raise the grain, because I want my sealer coat to penetrate deep into the grain. I’ll do some light sanding after my first sealer coat to knock back the grain and prep the surface for my topcoats

Step 2: Consider the Wood Grain
The next consideration is to fill the grain or not fill the grain.
In most cases, I would say this technique looks best without grain filling. Why would that be you might ask?
Grain filling can lend itself to a look of refinement in the finished product and because of this, many finishers will want to skip this step.
However, there may be some instances where grain filling is desired. For example, you may want to create a washed out look in white oak. In this case you could use Emtech® HSF5000 Grain Filler in the neutral tint, or for a more dramatic effect, you could tint the grain filler with around 2% of white tint. I like to apply two coats of the primer for the best results.
Step 3: How to Prepare your Wood Sealer Base Coat
Now we are at the stage of the process that can require a lot of fine tuning. How much brightening you want to do can vary a little by wood species and visual preferences. For my samples (which I’ll share in Part 3), I decided to provide several different looks to help give you a visual idea of where to start. I’m going to show the following mixtures:
• A mix at 2% white tint with application of one coat of sealer
• A mix at 2% white tint with application of two coats of sealer with a sanding between coats
• A mix at 5% tint with one coat of sealer
My method for combining the tint into the sealer is the same for each mix. I like to thin the EM1000 with distilled or deionized water by about 20%.
Before I add the water to the EM1000, I’ll warm it up a little. Not boiling, but warm to the touch. I’ll add my tint percentage by total liquid volume of the Sealer and water combined and stir thoroughly. The warm water goes a long way in helping to dissolve the white tint and incorporating it into the sealer.
Remember this important step and don’t be like me where I forgot on my first mix and had to throw out the batch because the tint only partially incorporated into the sealer. 🤦
After the tint is fully incorporated in the warm water, I’ll add and mix into the sealer. I recommend starting a little lighter on the tint for your first sample and then if you want more white, just mix a little more in some warm water and add to your sealer.
The trick here is to add enough white tint so the wood will reflect the light and make it look almost dry and dusty, but too much tint can distort the coating so that it’s visible to the naked eye.
Adding two lighter coats can add time to the process, but it also reduces the amount of white tint that settles on the surface and tends to be less visible as a haze.
Step 4: Apply and Sand your Wood Sealer Base Coat
After getting my mix where I want it, I’ll apply the sealer to my project. In the case where I’m applying two coats of sealer I’ll let the sealer dry about 1-2 hours and then sand with 320G to knock back the grain before I apply the second coat. Otherwise, I tend to let everything dry overnight before I sand with 320G and start applying topcoats.
It’s very important to not oversand your base coat. It can be easy to oversand and create shading effects on the wood that would be undesirable in the final look.
Step 5: Apply a Topcoat to your Wood Project
The next day, I’ll begin and hopefully finish application of my topcoats. For these samples, I decided to use Emtech® EM7000 High Build Lacquer – Flat sheen on one side and Emtech® EM9300 Polycarbonate Urethane – Satin sheen on the other. 3 – 4 coats at 3 mils wet film, depending on project specifications, is all that’s necessary to create a durable long lasting natural wood finish for this technique.
You’ll want to use either the EM7000 or EM9300 on your project because both of these finishes have a Cool Clear Appearance on application and will not color shift or amber with age. This will preserve the natural wood look you worked so hard to create.
Part 3: Final Results, Tips and Suggestions
OK, we have arrived at the moment of truth. Below, I’ll share photos of the final results…
A simple “workaround,” if you want to speed up the process…
And some tips and suggestions to avoid common problems and missteps.
Final Results:
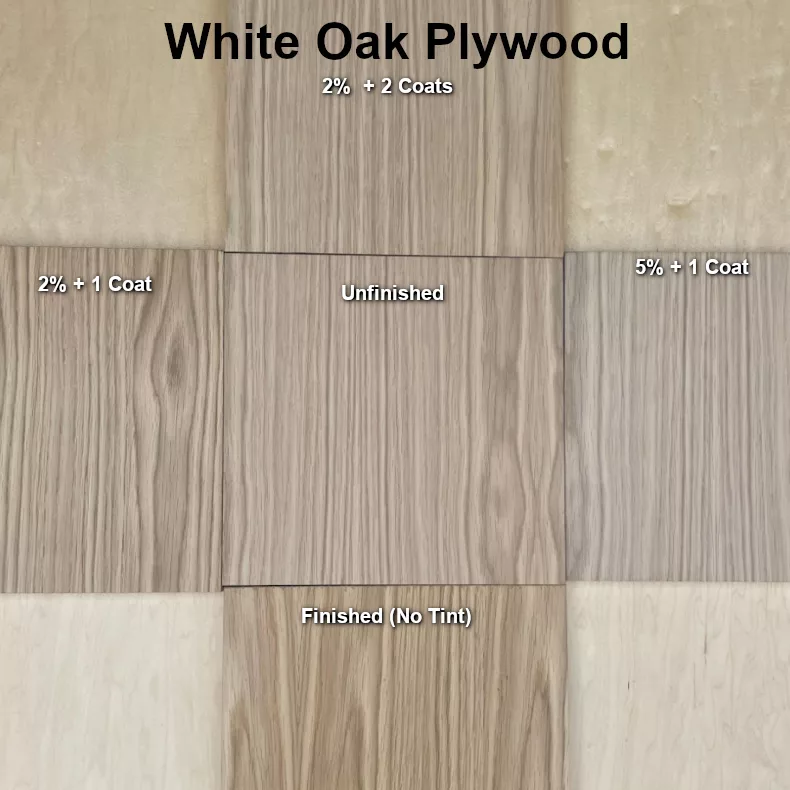
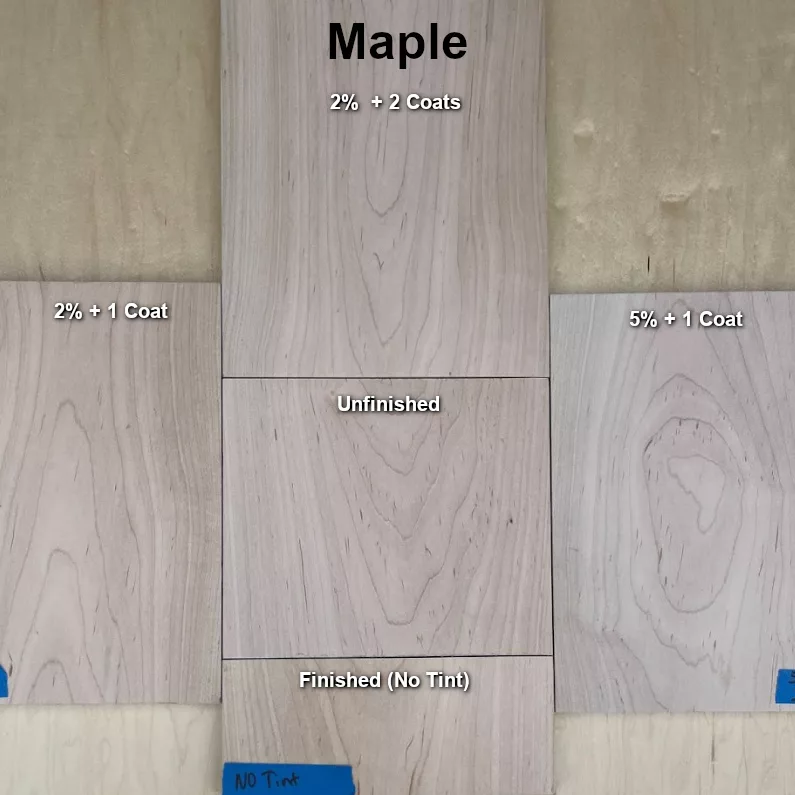
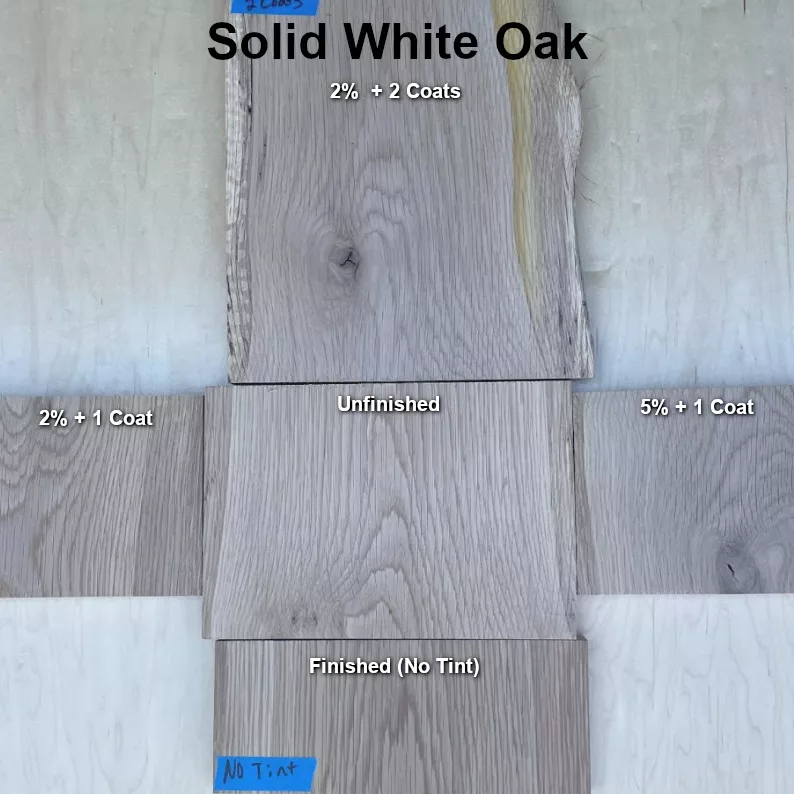
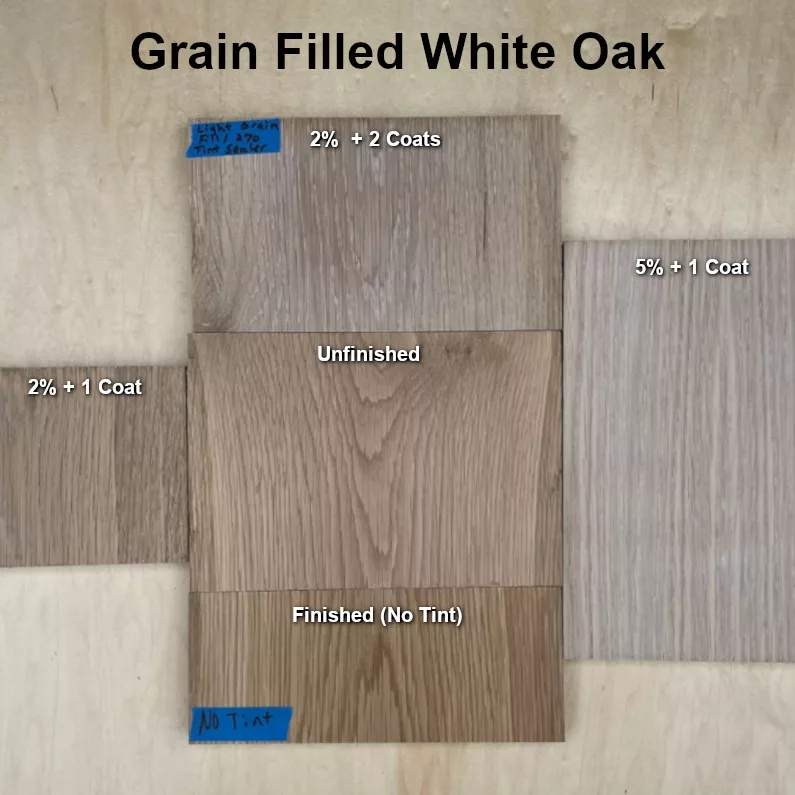
Below are some pictures of the samples I created. For each sample the format is the same:
• The center sample is unfinished
• The samples on the bottom of center are finished with no tint added to the sealer or topcoat
• The samples on the left of center are 2% mix with one coat
• The samples on the top of center are 2% mix with two coats
• The samples on the right of center are 5% mix with one coat
• One picture shows grain filling in white oak before application of the base coat(s)
In all my samples, my preference was two coats of sealer, tinted around 2%. I felt like it gave me the most flexibility and the best overall look, but it also was the most time consuming.
Here are the photos:
White Oak Plywood…
Maple…
Solid White Oak…
Grain Filled White Oak…
Sapele…
What about the differences in sheen? Well it’s very hard to show these differences in a photo, but in most cases this will come down to personal preference.
If you or your customer like the unfinished wood coloring of this technique, but you want it to look like a finish was applied, Satin may be your preference.
If you want it to have the coloring and the sheen similar to raw wood, then Flat will most likely be your preference.
EM7000 High Build Lacquer offers a Satin Sheen at 30° and a Flat Sheen at 10°.
EM9300 Polycarbonate Urethane offers a Satin Sheen at 30°, a Flat Sheen at 10° (and a new Ultra Flat Sheen at 5°, will be added to the product line in January of 2024.)
A Workaround for a Faster, Simpler Process
What if you read this and think…
“Well, this is a lot of work with possible grain filling and having one or two additional products and a two day process, I’m not sure I want to get this involved.”
I certainly understand that. Sometimes you have a customer who wants the look but isn’t exactly demanding perfection. Or perhaps you yourself want to do this project in a day and don’t want to be bothered with extra steps and coatings.
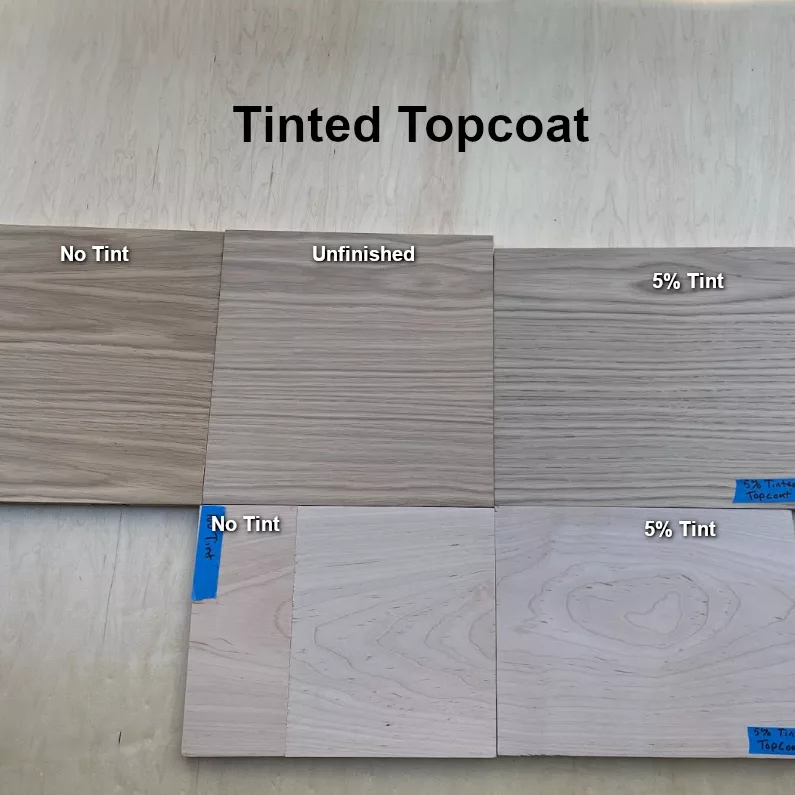
When simplicity is what you’re looking for, then just tint your topcoat for the first coat.
I like to thin my topcoat 20-30% and add some white tint around 3-5%. Apply the first coat, let it dry, sand, and begin applying your clear topcoats.
The results are very similar although I find it to be a little hazier than using the EM1000 Sanding Sealer as your base coat.
Here’s a picture of those results. Again, the unfinished wood sample is in the middle…
Tips and Suggestions to Avoid Problems
Okay, so what are some tips to avoid problems in this process?
• Start small with your tint amounts. It can be easy to be just right and then have too much.
• Mix your tint thoroughly with warm water first before adding to the sealer or topcoat. Tint that doesn’t thoroughly dissolve can put white specks on your finish and cause a lot of headaches.
• Strain with a very fine mesh strainer. Even if the tint didn’t thoroughly dissolve, you’ll catch these stray bits in the strainer.
• Keep mixing your tinted sealer or topcoat. The tint is pretty heavy and will want to settle to the bottom of your pot or cup. If you’re working on a project for several hours or days you’ll want to keep stirring.
• When it comes time to sand that first coat, do so gently and with a high grit around 320G. It can be very easy to create an uneven look by over sanding which happened to a few of my samples when I was sanding quickly and not paying adequate attention to my work.
I hope you enjoyed this article and it leads you to experiment and create the process and look that’s right for you, your shop, and your customers.
Do you have any experience or opinions on creating the natural wood look? Please share your thoughts or read what others are saying in the comments section below.
Seth Kline has been a woodworker, wood finisher and business owner for the past 25 years. After helping grow his family’s home remodeling firm — Roy B Kline & Son — both as a craftsman and business operator, in 2013 Seth became the co-owner, lead woodworker, and shop manager of Stor Handmade Furniture, a highly successful solid wood furniture shop specializing in bespoke, hand-made and hand-finished pieces. In 2023, Seth launched SBCraftsman, which offers spray finishing and small business consulting to private clients. Originally from Pennsylvania, Seth now resides in Aberdeen, N.J., and is a proud member of the Central Jersey Woodworkers Association.

I am still very much a novice in spray finishes, and only been using Target Coatings for a few months. I do enjoy experimenting though!
Could you share some of the proportions you used with the white enamel and the sanding sealer. It might give us a bit of a starting point.
Thank you and I’m looking forward to reading more.
Hi Karl,
Thank you for commenting and your interest in this technique. This was a long article and will be released in 3 parts. Please stay tuned as I provide some suggested proportions for mixing a tinted base coat, some tips and suggestions for how to apply the tinted sealer and topcoats, and even some pictures contrasting this technique with an un-tinted finishing technique.
Seth, I’ve got to admit that I’m really excited to see for myself how well this finish will come out, as I have just the project in mind for it. Thanks for sharing your wealth of finishing knowledge with us. I can hardly wait to see what other tricks you’ll be revealing in the next 2 parts. Bring ’em on!!
Cheers from Canada,
Marty Schlosser
Hey Marty, thanks for the positive feedback.
I always very much enjoyed and appreciated all the articles you posted for Target Coatings.
I look forward to adding my humble contributions to the vast wealth of knowledge found on this website in the way of tips, special techniques, and comprehensive information on finishes, that is provided to Target Coatings customers and the finishing community at large.
hi! do you use a white tint by Target Coatings?
Hi Justine,
Target Coatings does not offer a white tint for this process.
I recommend you use one of two different tints that are readily available online. One is, Titanium White from Golden Fluid Acrylics, and the other is, Oxide White #25 from Mixol. I have found both tints to be comparable to each other so for some it will come down to personal preference.
Please remember to distribute and mix the tint in a little warm water before adding it to your base coat.
Thank you for the three articles, just amazing results! Can’t wait to give this a try.
Hi Larry,
Thank you for the positive feedback. I’m so glad to hear you enjoyed the articles.
If you have any follow up questions about the process while doing your own experimenting, you can always contact us via our contact form on the website for additional help.
When showing several wood finishes I find the most preferred finish is oil and wax. Most people prefer a finish that brings up the colour and figure in the grain, along with the very smooth and touchable appeal that a very thin finish that leaves the texture of the wood apparent all add to the appeal. There are several ways I’ve found to get this. Tung oil rubbed onto a finely sanded surface (320) and then wet sanded with 400 and then another coat sanded at 600 and finally a wet coat rubbed with fine steel wool or scotch brite. Finally a coat of quality wax and buffed out. This is a fantastic looking and feeling finish but also the most fragile of the choices. French polished shellac can achieve a similar appearance but takes a bit of experience to apply and get just right. Finally a thin spray application of water based lacquer and rubbed to a sheen (but not mirror) can get a similar appearance but again takes some experience to apply at the right thickness (too much material and it starts to look artificial) and has the advantage of providing more protection. I’m looking forward to experimenting with a ceramic micro finish over all 3 of the above (I would leave out the wax and go over the cured tung oil). It looks promising in that it could give added protection over a natural look.
Hi Bob,
Thanks so much for adding to our discussion on this topic and offering some insights into alternate methods for creating a natural look finish.
-Seth Kline