When we shop for spray equipment (including a spray gun air cap set), we’re flooded with all sorts of technical information that, at times, makes the waters a bit muddy in trying to make a final purchase.
Do we want a turbine unit? Do we want a compressed air gun? Is my compressor the right size for the gun I am looking at? What type of coatings will I be spraying?
Yes, it can get complicated – especially when we need to decide on the right fluid assembly parts, i.e., the spray gun air cap and the needle/nozzle size to ensure we obtain the right quality of final finish.
Many of my seasoned clients are still heavily invested in guns that are set up to spray low solids, high solvent content finishes such as nitrocellulose lacquer and conversion varnishes.
The guns they purchased 30-40 years ago were designed and set up to spray these “hot solvent” finishes with small needle/nozzle sets. This is due to the low viscosity of these types of coatings.
Also, certain types of high-pressure spray guns have air cap designs that can handle the low solids being atomized – configurations sometimes referred to as “lacquer guns.”
As we know, lacquer has changed over the past 30 years and therefore so has the type and engineering quality of the spray equipment being used to deliver the newer waterborne coatings that are now prevalent in the market.
Most of the good spray gun manufactures offer a chart that helps you determine how your spray gun air cap assembly should be configured based on the type and viscosity of the coating be applied.
Very often these charts are good starting-points, but they certainly leave room for adjusting and fine-tuning your finishing performance.
Many of these charts corollate the viscosity of the coating based on a unit of measurement called Zahns or Ford viscosities.
These viscosities are measured in specially designed cups and are timed is seconds. To complicate these charts a bit more, these types of viscosity cups come in different sizes – and they all vary based on the quality of the cup being used.
As you continue to read the chart, you’ll see specific air cap and needle/nozzle sets suggested for each viscosity measurement. This is where I find most of my “specifications oriented” customers fall down the precision rabbit hole. Many take these charts to be the final word, and very often the charts are misleading.
Do these charts get you into the right neighborhood? Yes, but they should not be taken as gospel – like I said above, these things get complicated and you need to be ready to make adjustments on your own accord or through the recommendations of the coating supplier.
So, let’s circle back to the air cap and nozzle/needle set size requirements…
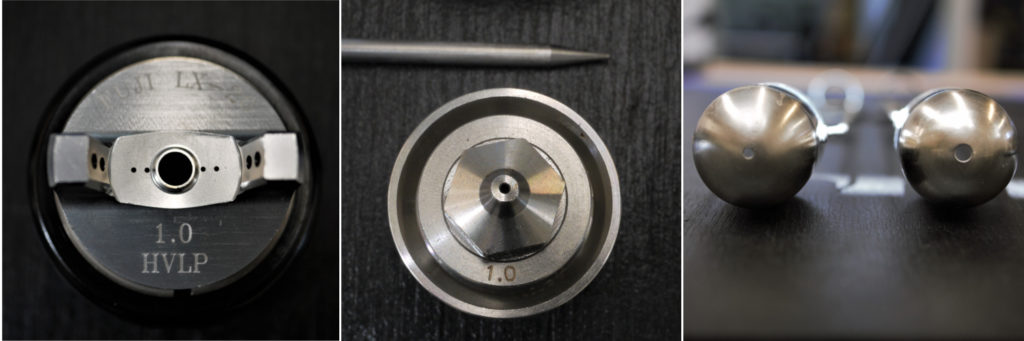
We know that caps, tips, and nozzles range in size from less than 1 millimeter (1.0mm) to 2 millimeters (2.0mm) is diameter.
The purpose of the starting-point viscosity chart is to help you select the right fluid nozzle/needle set. These sets are engineered with great precision to allow the coatings to flow through the nozzle based on viscosity and specific inbound fluid pressure.
The air cap, which is what you see on the outside of the gun head is matched to the size of the fluid/needle set that is set inside the gun. The fluid nozzle and needle help to get the fluid to the air cap and the air cap helps to break-up and atomize the coating as it exits the gun.
Nine times out of ten, the air cap is well matched with its mated nozzle and fluid needle, however, there are occasions when you may want to try a larger or smaller air cap to see if it helps in the final atomization process.
Swapping out an air cap with one that’s one or two sets larger can really help you dial-in your final finish – especially when using a turbine unit that has limited CFM adjustments.
We’ll drill deeper into the nuances of setting up your spray gun in future blog posts.
For now, tell me how you set up YOUR gun and how you dial-in your atomization quality.
Please share your thoughts or read what others are saying below in the comments section.
Great post. Looking forward to the next one!
Thanks, Mike!
-JW-
For all your coatings I start, and usually end with a 1.3 needle/air cap. I’m using an earlex 6003 three stage turbine system. My customers and I are very happy. It’s still not Amish quality that use solvent based tinted conversion varnish. But I’m not going to blow up my paint booth either. Just my two cents. Great products. Keep up the good work.
Thank you, Brad. We’ll keep doing our best for you and all of our customers :)
-JW-
I spray HVLP with an automotive gun. It’s a DeVilbiss FLG4, water based.
When I ordered you advised me to run the 1.8 and I did. I have been spraying at 16 to 18 psi. I do have 1.3, 1.5 and a 2.2 tips also.
As far as I know there is only one air cap for my gun. So I run it.
I extrapolated my pressures by listening to The Gunman on youtube. He’s pretty entertaining if you want to geek on auto paint guns. In listening to him test my gun I heard him suggest 12 psi for primer which is shot with a 1.8, 20psi for basecoat which has solids, and 25 for clear top coat, the thinnest. I shoot the base and clear with my 1.3 tip.
I was able to get some nice results with your 6600 pigmented lacquer.
BTW, I test every thing with a Ford #4 cup. Your 6600 took 45 seconds as I recall. Which makes sense because 45 seconds thinned is what gives me nice results with plain ol hardware store paint.
Hope this helps.
Peter – Thank you for sharing your information with us. We always like to find different sources to use as reference points.
-JW-
Those pressures are at the gun inlet using filtered 3/8″ ID lines and real Milton 3/8″ fittings. It makes a big difference!
I’ve been spraying the Target finishes for many years using an older (’06) Accuspray model 19c HVLP gun with a 2.5 gal. pressure pot setup. Most recently project I used the EM6500 custom tinted lacquer over the HSF5000 primer. I use a 1.1mm tip & nozzle set with the #807 air cap. For the lacquer the main regulator set at 30psi with the gun triggered, pressure pot set at 10psi. For the primer I have to kick the main up to 45-50psi and the pressure pot to 12psi. I have tried a 1.5 tip & nozzle with a larger air cap for the primer but haven’t been happy with the results so have stuck with turning up the presses; not ideal I know.
I’m thinking of upgrading|replacing the gun I have so curious to read more about the Fuji set-ups you all will be offering. Anything for a pressure pot setup?
Joe – The current Fuji LX-20 configuration that we are now selling is a gravity gun. Fuji does offer the LX-20 in a pressure-fed configuration. Give me a call directly and I’ll help you get set up.
800-752-9922
-JeffW-
For your clear finishes, I normally use a 1,4 needle and air cap (HVLP and LVLP guns). With the pigmented lacquers, I go up to 1.8. In the winter time, I’ll set the can near the radiator to warm up a bit, it seems to flow better.
Rob – Thanks for sharing your set up with us. It shows that I am pointing my gun configurations in the right direction ;)
-JW-
I like Peter have the FLG4, also two Iwata W400 and just got the DeVilbiss Pro Lite with 2 air caps and 1.2,1.3,1.4 fluid nozzles.Spraying em6000 and em8000,I find for me the 1.4 nozzle gives me the best finish.PSI 18 on the Iwata and DeVilbiss around 22 at the gun inlet.Viscosity I use the Charles Neil method.If it will come out of a medium mesh strainer about the same speed as I pour in,I can spray it.Works well for me! Thanks Jeff, looking foward to your next post