Most of the finishes you’ll see used on wood products are film-forming. And there are several reasons for this:
They meet and, in most cases, exceed the KCMA standard (how a finish performs against typical household substances and extreme temperatures)…
They are highly durable…
And they are quick and easy to apply using standard finishing equipment and techniques.
Just to ensure we’re all on the same page, by definition, a film-forming finish creates a coating or “film” on top of the wood surface. And they’re ideal for the vast majority of projects.
But there are some situations when another finish type is required. And that’s where penetrating finishes come into play.
In this article I’ll outline when and why a penetrating finish is called for. And I hope that by the end of this article I’ll have convinced you that this unique family of finishes deserves to be added to your finishing lexicon.
Penetrating Finishes Can Take a Beating. Literally.
Surfaces that will be subjected to extreme abuse – such as those designed to be hammered upon – need a finish that can tolerate dents and dings.
For example, to the work surface of my workbench, I applied 100% pure hemp oil, a product known for its ability to penetrate deeply into the wood. Three coats were applied, and after having curing for a few weeks, two coats of furniture paste wax were rubbed on to enhance the protection.
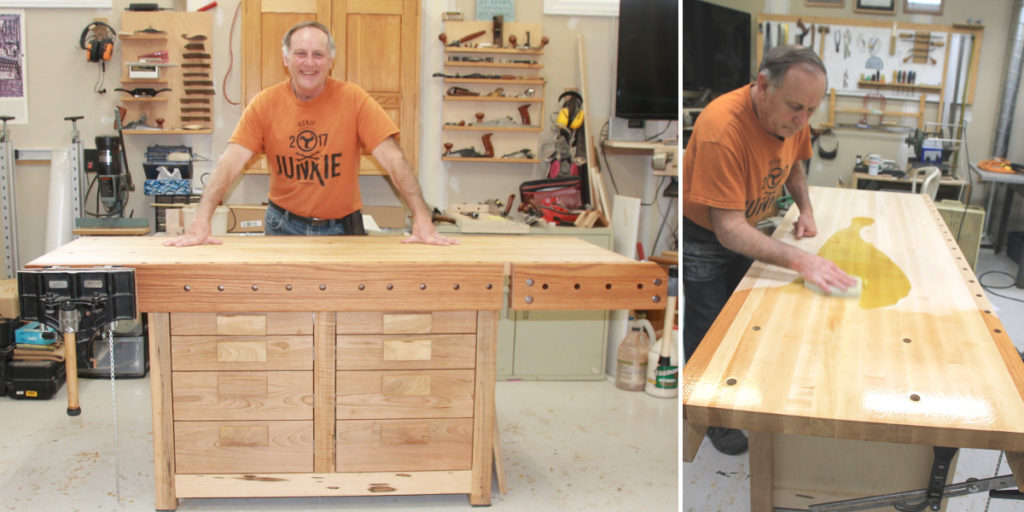
But when it came to the drawers, I elected to seal the insides with Target Coatings EM1000 sanding-sealer, then applied Target Coatings EM2000 water-based alkyd varnish to the fronts because a film-forming finish makes better sense for those parts of the workbench that won’t be subjected to such extreme abuse.
Penetrating Finishes Tolerate Cutting, Chopping and Extreme Heat
Example 1: Kitchen Tables and Islands
Kitchen tables and islands need to handle all sorts of abuse: they’re pressed into service as chopping boards, trivets to hold oven-hot baking or frying pans and to handle the day-in, day-out work that goes on in a kitchen.
For this reason, I apply mineral oil, which is also a food-safe product, to the tops of kitchen islands. And when the time comes when the client feels the need, a simple sanding and finish reapplication will renew the surface.
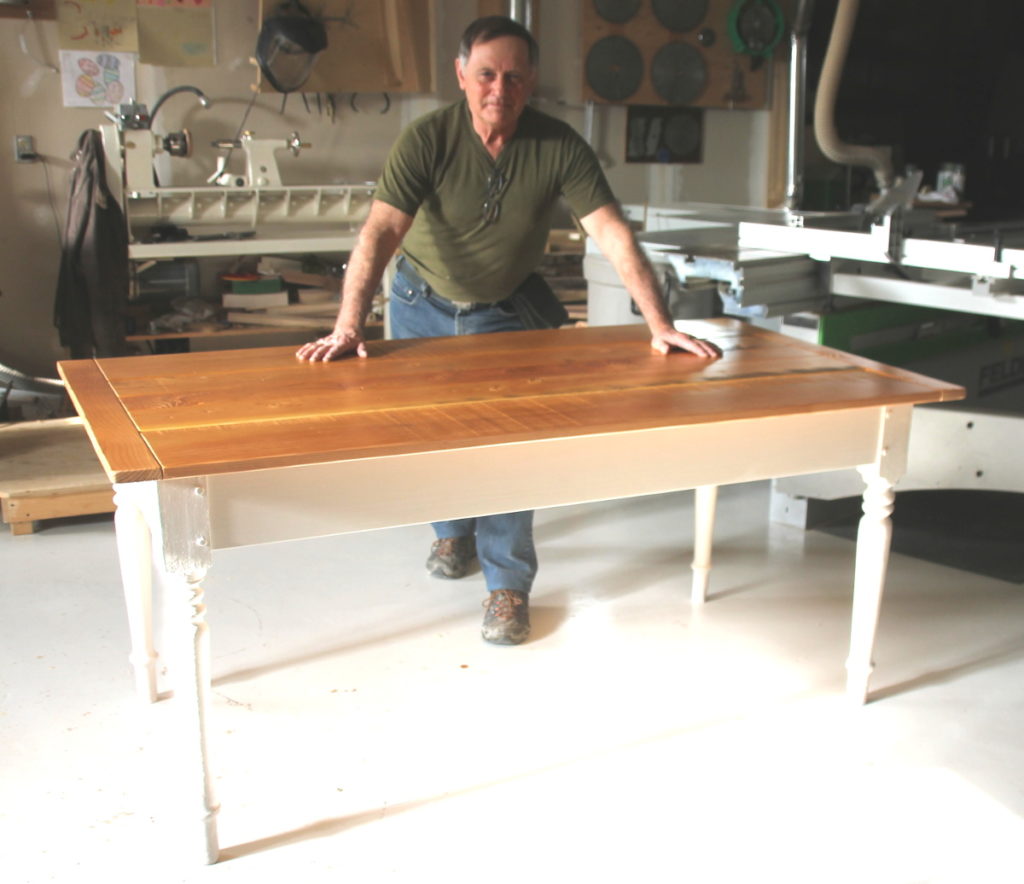
I’d like to point out that though clients often specifically request I paint the legs and apron with milk paint, a more durable product such as Target Coatings EM6500 pigmented lacquer can be a consideration.
Example 2: Charcuterie (or Cutting) Boards
By their very name, cutting board surfaces will be subjected to knife cuts. For this reason, I again use mineral oil, a food-safe product. And whenever the surfaces need to be renewed, it’s a simple matter to sand the knife cuts out and apply a few fresh coats.
Note: If I were making a butcher’s chopping block with an incorporated table base, I’d most likely finish the base in a more appropriate finish such as Target Coatings EM8000 conversion varnish, with cross-linker CL1000 added to improve the durability.
When Beauty, but Only Limited Protection is Called For
Let’s face facts: sometimes a quick and easy finish – such as one coat of tung oil – can be the ticket.
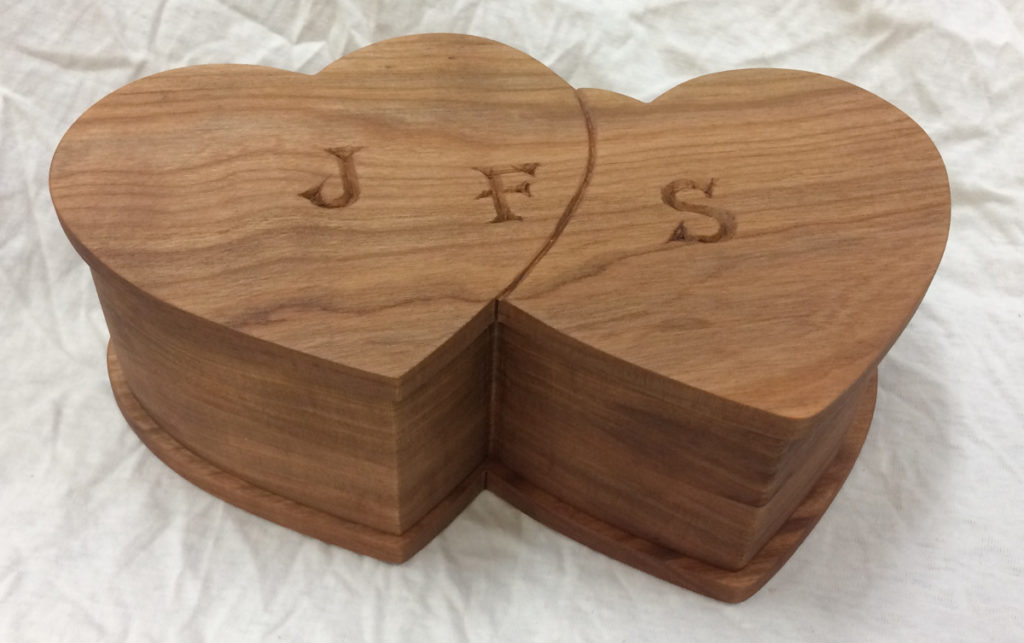
A good example of this is the jewelry box I made for my 10-year-old granddaughter. And even if it is dropped, any dents won’t result in the finish cracking. Fast, easy, effective. A penetrating finish is the perfect match for such items.
Easy on the Hands, While Improving Control
When it comes to paddles or oars, many serious watercraft users prefer the feel of bare wood, which they state provides for greater control.
So, to add protection without fully forfeiting that desired trait, I would typically apply a penetrating finish of 100% pure hemp oil to the parts they touch and a more protective, film-forming finish such as Target Coatings EM9300 polycarbonate urethane elsewhere. This is another great example where mixing finish families allows me to achieve even greater results.
In Summary…
I think the old saying, “There’s a time and place for everything”, really summarizes the best approach to selecting finishes.
Penetrating finishes for those projects or parts of a project where usage so dictates, and film-forming finishes for everything else. That’s the way I see it.
Please let me know what you think or read what others are saying in the comments section below — I’d love to hear from you! And if you have another topic you’d like to have me cover, feel free to let me know. I’m here for you.
Looking to choose a Coating for “Barker” kitchen cabinets, “cherry” primarily on the doors. I have used em2000 and em6000 before, after using the the target water sealer on bathroom “barker “ doors in a lightly used bathroom. I think I need it “hardier” in the kitchen. I use a Fuji 3 stage sprayer. I was thinking about conversion varnish, I usually ad transtint dyes to my spray for depth and shading. Any Recommendations would be appreciated. Ed Crone ecrone72@gmail.com.
Ed – Thank you for your inquiry. A really nice product combination of bright cherry is our NR4000 Cherry Toner stain or the NR4000 Clear Base used to deepen the color of the cherry (think a color similar to sunburned/oxidized cherry), top coated with 3-4 coats of Emtech EM8000cv in the sheen of your choice. You may want to add CL100 Crosslinker at 5% by liquid volume to the EM8000cv if the cabinets are to be exposed to high pH cleaning chemicals on a regular basis.
-JW-
Marty, like you, I’ve always used mineral oil for cutting boards/blocks (normally end-grain). I recently started making my own “board butter” using 4 parts mineral oil and one part bees wax (by volume or weight, doesn’t really matter, the ratio doesn’t have to be exact). Mix together and heat to 145-150 deg to melt the wax; mix, then pour into whatever container you’ll use. It cools to a creamy white and a little goes a long way. Really nice stuff. The wax fills the pores and helps to lock in the mineral oil. It lasts longer and enables easier cleaning – less concern about cutting raw meat, etc.
1. I plan to apply aniline dye (acetone solvent) and then your lacquer. (Counter stools, poplar).
2. When finishing walnut I always applied danish oil to bring out the grain and color. With your lacquer film finish can I still apply danish oil first? If not, how do I bring out the grain and color. What is the best sequence to do?
I have asked some questions a few days ago, but have not received a response. Please respond soon. Thanks
John – Yes, you can use a danish oil prior to applying any Emtech finish as long as you follow these rules:
1. Allow the danish oil to dry for a minimum of 72 hours at a minimum temperature of 65F.
2. After the 72+ hour dry-time, clean the dry oil film with a solution of water and alcohol mixed 1:1 to remove any oily diluent that resides on the surface of the dry oil.
3. Allow the water/oil to flash off.
4. Lightly scuff and with 400 or 600-grit aluminum oxide paper, followed by another cleaning with water/alcohol blend.
5. Apply the first coat of water-based finish in a very thin format – i.e. 1mil wet/tack coat. Allow this coat to dry for 1 hour. Clean this application per above.
6. Lightly scuff sand per #4 and then proceed with coats of WB finish applied at 2-3mils wet per coat.
-JeffW-