A candy coat wood finish can be achieved on many types of projects, and this article will focus specifically on how to achieve it even when you are working with darker colors.
Why am I highlighting “darker colors?”
When using darker, pigmented colors in a 1K paint coating system (a single-component coating that does not require a hardener/catalyst/activator), you are faced with a few common challenges that can require unique workarounds.
Let’s start with how darker colored coatings are made.
In order to achieve darker colors, paint manufacturers need to incorporate a lot of pigment into their resin base mixtures. Even with a clear resin base, for the darkest colors this can mean a substantial amount of resin is replaced with pigment to get that highly sought after color.
Depending on the brand and type of colorant used to tint the paint base, these pigments can lead to a softer, more scuff-prone finish when fully cured.
Obviously, this is less than ideal when you’re using these colors in kitchens, bathrooms, built-ins, or any project where the need for maximum durability, film hardness, and chemical resistance is a priority.
Some paint manufacturers recommend professional painters use a 2-component system, typically called a 2K paint system, that requires a highly toxic Part-B additive to catalyze the resin/pigment blend during the oxidation/curing process.
But unless these specific 2K systems are applied in a highly controlled, pro-shop environment, you (and your clients) can be exposed to these toxins.
Fortunately there is a solution to this problem and creating a candy coat wood finish for darker colors.
A Safer Way to Achieve a Candy Coat
Our customers have had great success using our EM7000 High Build Lacquer and EM9300 Polycarbonate Urethane.
Both of these products are clear, non-yellowing, water based topcoats that won’t color shift your pigmented lacquer paint coat and will ensure your deep, dark colors develop and cure into a hard, durable final finish.
(In case you’re wondering…EM7000 is for interiors and should be sprayed. EM9300 is interior/exterior rated and can be sprayed, brushed and rolled. You can see the other differences in this comparison chart.)
The application of these clear finishes over your lacquer color coat — this is what we call a “candy coat wood finish” —is an excellent way to protect these colors by giving them a hard shell with better mar, scratch, and chemical resistance.
It also makes them much easier to clean and will keep the painted surface fresh looking for many years to come.
We have been recommending this process to our customers for many years, but we have not had a lot of information on our website about this finishing technique, why it might be necessary, and how to do it…until now.
I recently spent a few days in the Target Coatings Lab applying dark colors with a clear topcoat to some samples using various techniques and documenting the process along the way.
Below, I’ll break down this finishing technique and provide some detailed information and pictures on how to accomplish a “candy coat” finish over our EM6500 Pigmented Lacquer.
I understand a “one size fits all” solution is not always realistic, so I’m going to provide some in-depth explanations so you can make informed decisions about how to use this process on your upcoming projects.
If any step along the way needs further clarification, please feel free to leave a comment below or contact me directly.
The Candy Coating Wood Finish Process and Methodology
As we all know, there are MANY factors at play when wood finishing, so I’d like to set a foundation for my results.
As discussed in a previous article on Cold Weather Application of Wood Finishes, temperature levels and humidity are going to be very important especially with application of these darker colors. Having a warmer spray booth and/or drying room during the cold weather months can lead to faster turnaround and better overall results.
That being said, I decided to push the boundaries a little in my testing. I allowed my spray application temperature to be in the low to mid 60°s F and my drying temperatures in the upper 60°s F.
I used an infrared light to add some extra heat to the samples to help the drying process along. The shop’s humidity was between 30% and 40%. In these conditions and with careful use of the infrared light, I was able to keep the finishing schedule practical and sensible for a finishing professional looking to finish their projects with high quality in a reasonable time frame.
I use mostly HVLP guns, either a FujiSpray T75G or FujiSpray LX-20, that I use with a turbine and/or compressor based system. I expect that airless or air assisted airless equipment can easily be adjusted to provide the same exceptional results. I also successfully applied this technique using brush and roller methods of hand application, but that’s material for another article.
I applied this technique to three different types of samples:
- Cheap maple plywood from a big-box store
- High quality, MDF core, maple veneer sheet goods from a local lumber yard
- High quality oak plywood
I purposely used the cheaper grade of plywood to see what could be expected visually when applying two coats of HSF5000 high solids primer.
I was very impressed with the results and could easily see these lower grades of plywood being used in less visible areas for a budget option. While many imperfections were still visible with glare, this is hardly a problem on cabinet interiors.
Here is a basic overview of the finishing schedule I followed for all of my samples:
• Sanded all of my samples to 220G. Cleaned with a vacuum and duster attachment.
• Applied one or two coats of HSF5000 Primer allowing 1-2 hours of dry time between coats. For samples with two coats of primer, I allowed for an overnight dry period. For samples with 1 coat of primer, I applied my pigmented color coats after 2 hours of dry time.
• Sanded primer coat with 320G or 400G sandpaper either by hand or with an orbital sander.
• Cleaned the surface with a spray solution of 1:1 water and denatured alcohol, wiping the surface and allowing it to flash off dry.
• Applied 2 coats of EM6500 Pigmented Lacquer, allowing for 1-2 hours of dry time between coats. Light scuff sand with 400G only when necessary between coats for dust nibs.
I allowed these pigmented coats to dry overnight before applying the “candy coat.” It’s important to allow your EM6500 to dry a minimum of 14-16 hours before applying the clear coat.
After my pigmented coats were fully dry, I did the following…
• Light scuff sanded by hand with 400G sandpaper to knock back dust nibs and prepare the surface for the clear coat. Cleaned dust with a dry cloth.
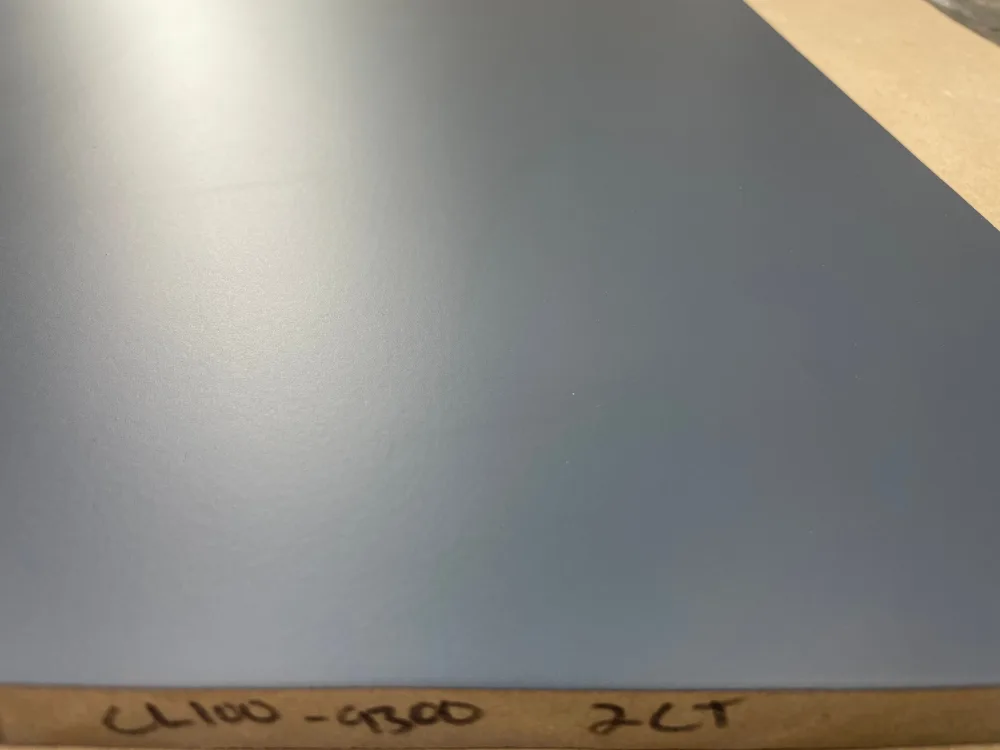
• Applied 1 or 2 coats of EM9300 in the Flat Sheen with added CL100 Crosslinker or applied 1 coat of EM8000cv in the Flat Sheen as a final topcoat.
• Allowed the final coat to dry 24 hours before a 1st stack test or 120 hours for a full cure before a final stack test.
The following images show a final candy coat wood finish on three different samples…
As you can hopefully see from these samples, a rich, dark, solid-looking color with a harder final film and increased water and chemical resistance can be achieved using a relatively simple finishing process.
While I finished my samples with a Flat sheen (which tends to be a little more photo friendly) you can accomplish the same results with a little more depth using our Satin or Semi-Gloss sheens.
In Part 2 below, I’ll dive a little into some details of the process and answer some common questions about what to expect when using this finishing technique.
Part 2: FAQs for Keeping Your Candy Coat Wood Finish Efficient and Profitable
Above, I talked a little bit about why you might choose to candy coat your pigmented lacquer paint, but let’s delve deeper into why this finishing technique would be necessary and how to keep it efficient and profitable.
As we discussed, darker colors tend to be softer due to lower amounts of resin per volume of product.
Now, you might be thinking…
“What if I add some CL100 Croisslinker to my color coat? Won’t that make up for the difference in the lack of resin?”
While it is true that CL100 Crosslinker would provide you with some benefit and give these colors a harder final film, there are some complicated issues at play.
CL100 works by binding with certain components in the coatings. These components are more readily available in the Emtech® varnish and urethane resin formulas compared to their acrylic lacquer formulas.
This is why we recommend only around 3% by liquid volume of CL100 for our clear lacquers (EM6000 and EM7000) and our pigmented lacquers (EM6500 and EM6600).
Whites, Pastels, and Mid-tones have sufficient resin binder to react well with CL100, but it tapers off in the deep and clear bases for the darker colors where there is even less resin and therefore fewer components for CL100 to bind with.
As you can see, it’s more advantageous for a finisher to use a clear topcoat that can accept a larger percentage of CL100 and therefore get a final dry film build that is harder, more durable, and more chemical resistant.
Of course, not all projects require this hard candy coat wood finish. Maybe you just want the best you can get from the color coat, or maybe you prefer a clear coat but are looking to create the highest quality finish you can.
In these circumstances, feel free to add CL100 Crosslinker at 2%-3% by liquid volume to ALL coats of your finishing schedule. You can even add it to your primer coats.
Another advantage to candy coating your projects has to do with sheen levels.
EM6500 Pigmented Lacquer comes in our most popular sheen level, Satin, but what if you want your project to have less luster or more shine? This is another area where your clear candy coat can come into play.
Our clear finishes come in a range of sheen levels from Flat to Gloss. Choose a sheen level that works best for your project or mix sheen levels in the same Emtech® finish family to create the custom sheen level you need for the ultimate flexibility. A single coat of clear finish over your color coat is all that’s necessary to change sheen levels.
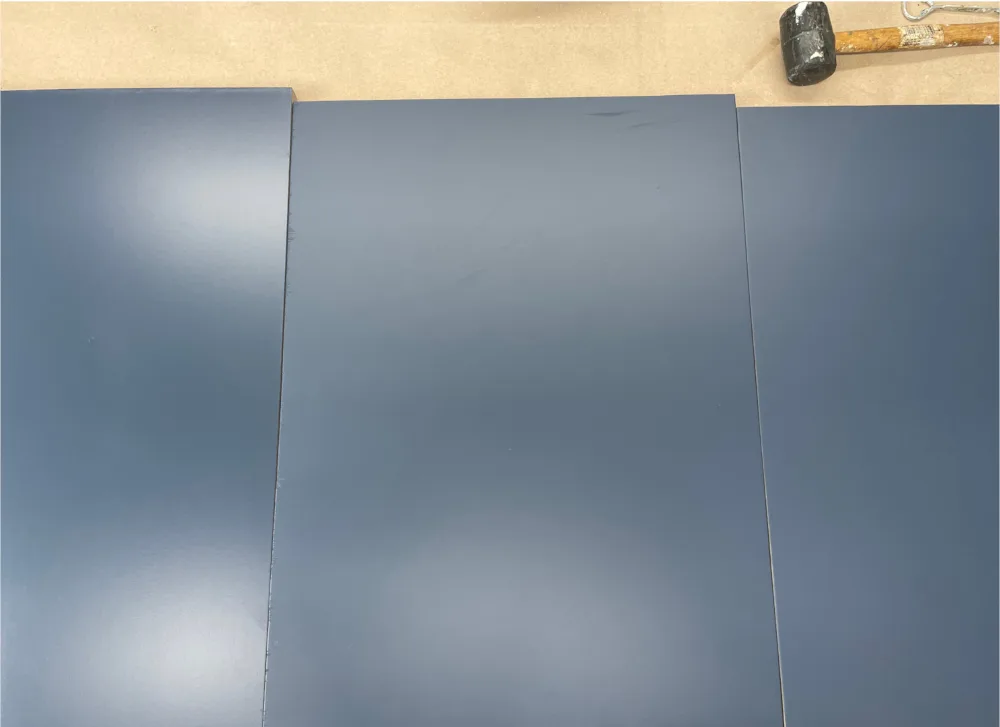
Take a look at this picture to see the difference between a Satin sheen clear coat (left) and Flat sheen clear coat (center and right).
An important cost effective question that might come to mind is…
“Will I be applying additional coats of finish?”
This is a great question and a legitimate concern when working on a project where time and material costs need to be controlled. The answer to this question is, “No.”
For the number of coats, we typically recommend 3-4 coats of paint for an adequate final dry film thickness and the best protection of your surface.
Because HSF5000 Primer and EM6500 Pigmented Lacquer have excellent hiding abilities, you typically only need one or two coats of these products for full coverage.
So, instead of applying 4 coats of paint for the best protection, you’ll apply 2 coats of paint and 2 coats of clear for even better protection of your surfaces.
Please take a look at following two pictures:
This first image shows the HSF5000 Primer applied as one coat over a white painted surface…

This next image shows EM6600 Raven Black applied as one coat over the gray primer…
These pictures show that you can be confident in the hiding power of these coatings and in many circumstances a 2 Primer, 2 Color Coat, and 2 Clear Coat application schedule will produce excellent and long lasting results.
Another question we hear is…
“What about using Target Coatings EM8000 Conversion Varnish or EM6000 Production Lacquer as a topcoat?”
It’s no secret EM8000cv Conversion Varnish has a slightly harder final dry film than EM9300 Polycarbonate Urethane. This can mean faster stack times and better mar and scratch resistance with the final coat.
The potential problem with using EM8000cv or EM6000 Production Lacquer as topcoats is this: these are warm finishes meant to mimic their solvent counterparts more closely. This can mean they will color shift your whites and pastel colors with a slight straw color that could amber a bit more as they age.
However, if you want to use these finishes over darker colors where a slight straw color tone will not be noticeable or matter, then please feel free to use EM8000 Conversion Varnish or EM6000 Production Lacquer as a clear candy coat over these dark colors.
Flipping and Stacking a Candy Coat Wood Finish
To wrap up this article, let’s briefly cover flipping and stacking because I know there are a lot of finishers out there who struggle with flipping and stacking darker colors — it presents challenges that require some unique solutions that can vary from project to project.
First, I would like to reiterate that thinner, even, wet film coatings, with plenty of dry time between coats, in ideal drying conditions can really make a difference when trying to prevent problems with sticking and getting your project out the door in a reasonable time frame.
That being said, using a clear candy coat can be a powerful tool in your arsenal to help accelerate stack times and control problems with sticking.
Without getting into too much detail, I stacked my samples face to face with various weights ranging from 8 lbs. to 24 lbs. in a range of time frames starting at 24 hours dry time up to a full 120 hour cure.
My results were as expected and can be summarized as follows:
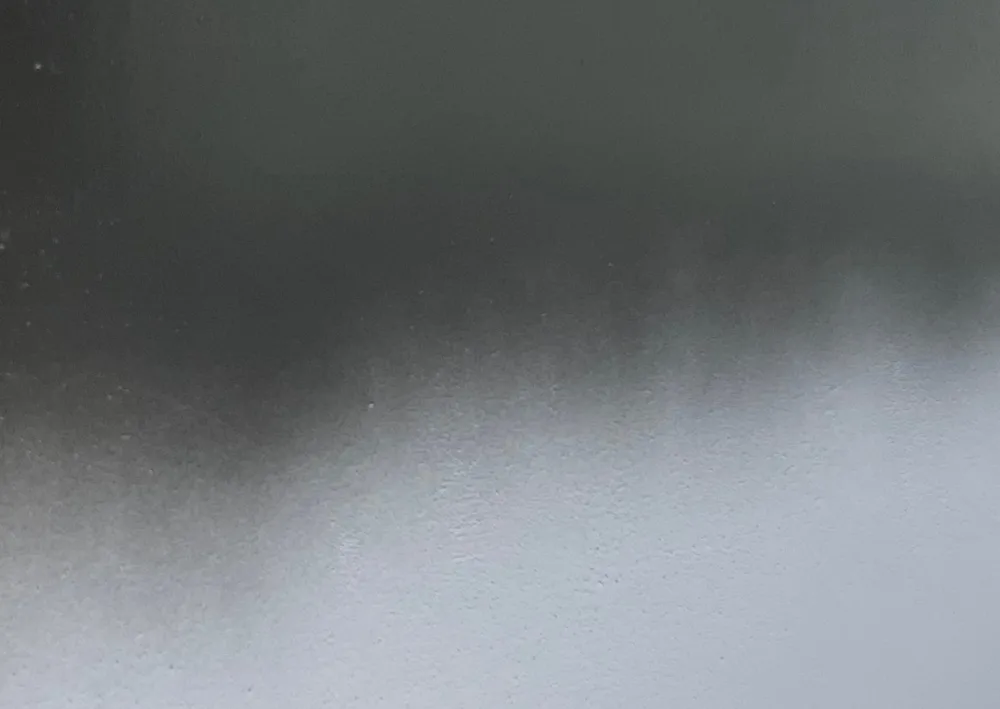
- EM8000 Conversion Varnish performed the best. With an application of only a single topcoat and 24 hours of dry time, this clear finish was able to come away with only very slight marring in the 8 lbs. test (photo below).
With 36 hours of dry time there were no marks at all. EM8000 performed exceptionally well at 120 hours of full cure and 24 lbs. of stacking weight.
2. I would recommend that if you need fast and hard results and a slight color shift is not an issue, make EM8000 Conversion Varnish your topcoat of choice. My test coats were without the addition of CL100. Based on my testing with CL100 added to the EM9300, the addition of CL100 Crosslinker will most likely improve the performance of EM8000cv.
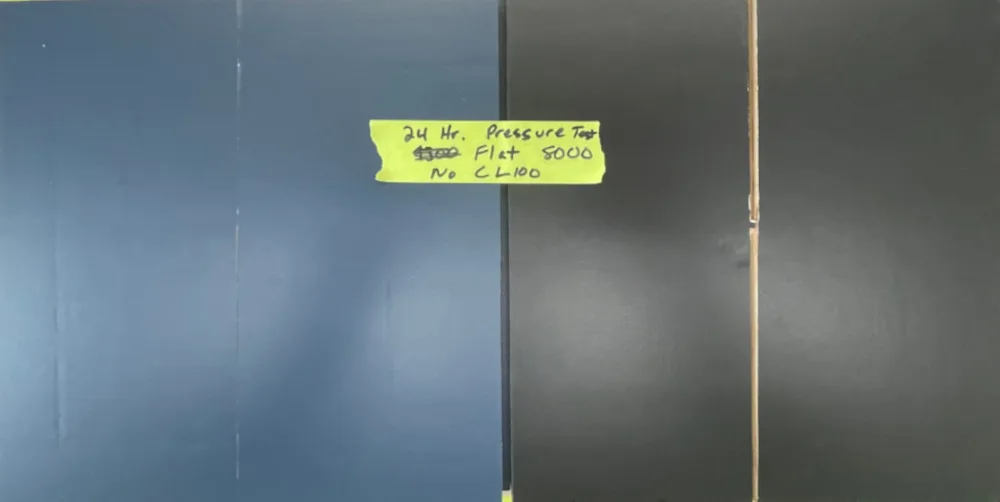
3. A single coat of EM9300 Polycarbonate Urethane performed much better in stack testing than without a clear topcoat at all. However, when no CL100 was added, a full cure of 120 hours was necessary before it pulled away with no damage when stack testing face to face with weights. The below image shows results of stack testing with only 24 hours of dry time.
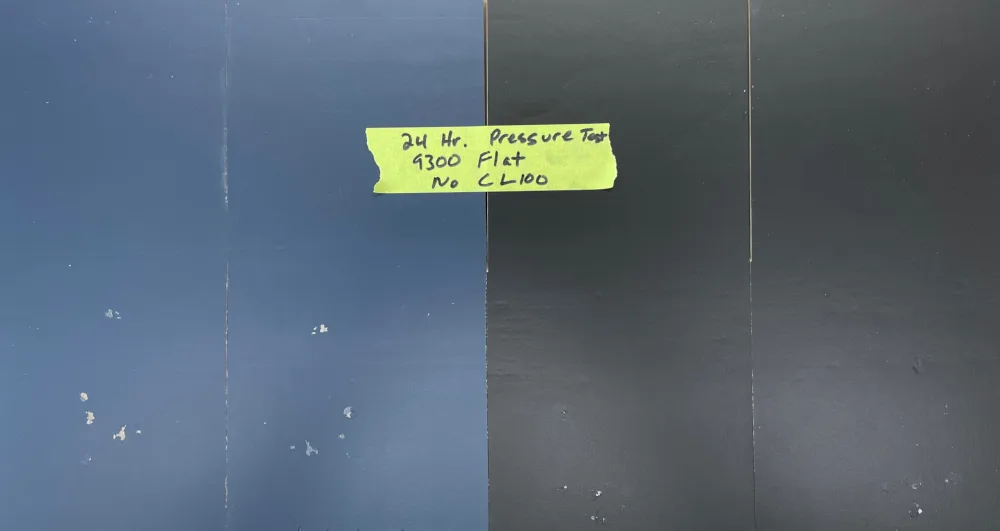
4. EM9300 performed much better when 5% by liquid volume of CL100 was added. I also saw improved results with the application of 2 topcoats as opposed to a single topcoat. The added crosslinker to a single coat of EM9300 allowed for faster stack times at heavier weights, although the best results were still at cure times approaching 120 hours of full cure. When 2 coats of a CL100 enhanced EM9300 were applied, the results were more in line with my test results for EM8000 Conversion Varnish. The below image shows the difference between 2 coats (left) and 1 coat (right) after 24 hours of dry time.

5. When EM9300 is necessary as the topcoat for its clear, non-yellowing performance, I highly recommend the use of CL100 Crosslinker. Application of two coats and warm temperatures (70°+ F) for the first 24 hours should produce excellent results.
6. If warm enough drying temperatures are possible, the addition of CL100 Crosslinker into the color coats at 2% by liquid volume will most likely increase performance. I did not test this, but given the improvements I saw with its addition in EM9300 I can only assume this would be helpful.
In conclusion, there are a lot of good reasons to find a way to make a candy coating wood finish part of your finishing process when using any color of Target Coatings EM6500 Pigmented Lacquers — not just dark colors.
I would seriously consider making this part of your regular finishing schedule with any project that will come under regular daily use like kitchens and bathrooms.
The added benefit of a more chemical and water resistant coating, especially with the addition of CL100 crosslinker, will make any project in these areas durable and long-lasting.
When you consider these benefits can be gained with no additional coats and minimal inconvenience in time management, I think you can be confident that it’s worth the extra effort.
What do you think? Do you have any questions or comments on this article or your own experience creating a candy coat wood finish?
Please share your thoughts or read what others are saying below.
Thank you, your article was beneficial. I’m always looking to improve the quality of my work and appreciate the work you put behind this. I liked how you enlightened us on the time frames used. If you would, please share the paint tip size used; and lastly, whether the products applied were thinned down.
-Kevin, Amberhill Style
Kevin,
Thanks for reading and providing positive feedback on this article.
Tip sizes can depend on size of the project I’m working on and whether I’m using a full gravity cup or a pressurized cup. Let’s assume you are working on average sized projects with a pressurized cup like the T75 HVLP gun (siphon or gravity), tip sizes would be as follows: 2.0MM for HSF5000 Primer, 1.8MM for EM6500 Pigmented Lacquer, 1.3MM-1.5MM for EM9300 Polycarbonate Urethane or EM8000 Conversion Varnish. For smaller projects a step down in tip size might be beneficial for better control of fluid (provided you have adequate pressure). When working with medium or large sized projects using a full gravity gun like the LX-20, I’ll typically move up one tip size larger for each of the above. If I don’t have a larger tip size I will thin the product 5-10%. This will help drop more fluid at the tip and allow faster spray times. For airless units, a *12 or *14 tip is generally the best for Primer and Pigmented Lacquer and a *10 or *12 tip is best for the Clear Topcoats. This also can change depending on project size and fluid control. One step up or down can be helpful.
As for the question of thinning product, I try to avoid thinning my product unless absolutely necessary. Thinning can typically mean additional coats required and I want to avoid that. Whenever possible I will increase tip size and/or pressure when I’m not getting the amount of fluid I need at the tip. Sometimes thinning and/or retarder are necessary. In warmer environments and summer months, I’ll typically add SA5 Retarder to help flashing and dry time of the coating to get better leveling. Also, SA5 Retarder is almost a necessity when using hand application techniques. If I don’t have a larger tip size, I’ll reduce 5-10%. If you have a smaller turbine and you’re not getting the atomization you need, thinning can also be necessary. So in short, I did not thin any coating with the above samples, but depending on environment conditions and equipment used a finisher may need to use Retarder or distilled water to get the best results.
Thanks again for you comment,
-Seth Kline
Do you need to fine sand the 9300 topcoat for a final smooth finish in satin sheen?
Hi Bob,
Thanks for your comment on this article.
It is not required to sand the final coat of EM9300 topcoat for a smooth finish. Provided you have good application skills and dust free environment you can get great post application results. However, if you have some dust nibs or a little coarseness in the final finish from overspray you can also just do some light dry sanding with a very fine sanding sponge, brown paper bag, and/or fine sanding pads for a super smooth surface.
-Seth Kline
This is timely. I just finished a call-back for a 5 year old, two-tone kitchen. The white was all fine, but the navy blue had severe chipping (General Finishes Enduro paint).
Matt,
Thanks for your comment. You’re not alone. Target Coatings has heard from many customers with these issues which is why we are doing our part to help explain and give additional options to the finishing professional.
-SK
ANOTHER terrific finishing schedule and set of tips from Seth! I especially appreciated the additional information on 2K vrs 1K finishes (as I’m always sensitive to environmental and health issues) and how clearly he explained why darker coloured (Canadian spelling…) paint bases may dictate including a topcoat step in the schedule.
Oh and for the record, I am a huge fan of your EM8000 conversion varnish, which I’ve come to rely upon for most of my topcoating needs.
Hi Marty,
Thanks for the comment and compliments. Very much appreciated. Glad you enjoyed the article and please stay tuned for Part 2, which includes why you might want to consider using EM8000cv as part of your finishing schedule when using this technique. I’m also a big fan of EM8000 Conversion Varnish and often find it my go to finish when I need a hard durable coating on those projects that are more likely to get extra abuse from my customers.
– Seth Kline
I’m not a commercial painter. What do you mean by ‘flipping’?
Hi Dave,
“Flipping” refers to when you need to finish both sides of a project, like a kitchen cabinet door. When you flip these projects both sides need to look finished so the coating needs to be dry and hard enough not to make marks while it’s resting on the drying rack.
-SK
Great article, Seth!
I, too, much prefer not thinning any finishes, and for the simple fact that I’m not a chemist and therefore don’t have the experience necessary to understand fully the ramifications of playing around with the chemistry involved. I’ve come to appreciate the excellent results to be achieved with HVLP systems – turbine and compressor models alike – when you mount the optimal aircap set to your gun.
Case in point: I recently had to spray a 1K product (won’t mention the finish manufacturer here… but it wasn’t Target Coatings) dictated by a client, which measured at 34.9 seconds with my Zahn 5 viscosity cup. And for those of you who understand the universal viscosity measurement scale, that’s equal to 800 centistokes, which is more then two times outside the maximum 370 centistoke measuring range of a Ford 4 viscosity cup. But by mounting a 2.5 aircap set on my Fuji Spray T75G spray gun, and powered by my Q5 Platinum turbine set to maximum, I was able to lay down a killer finish without having to resort to any thinning whatsoever. In a word: impressive.
Again, thanks for such an informative article, Seth. Keep ’em coming!
Marty,
Great insight on using a viscosity cup to help with selecting the correct tip size. I really appreciate you adding this tip to the comments section. I’ll admit that viscosity measurements are not something I fully understand. I tend to be a little more trial and error when selecting a tip size. Perhaps I should do some research and we can connect to create a future post on this topic.
Thanks,
Seth Kline
You definitely should! I use the cup that came with my fuji 4 stage turbine and I bought a cheap stopwatch that I keep with the kit. I adhere to a really good viscosity guide that I got from a really good book on spraying called “spray finishing made simple” by Jeff Jewitt. This is the best informational tool I’ve ever gotten. As long as I adhere to that guide, it’s never steered me wrong. Also consider investing in something like the 3M pps cups. Best investment I made after my turbine. They have knock off brands now since 3M changed to their Gen 2 system and with water based coatings I’ll reuse them for a long time sometimes. Makes it a closed loop system so you can spray at any angle and they’re not so cost prohibitive that you don’t feel too terrible if you through them out after a big project.
Hi Ron,
Thanks for adding to the conversation. Great comment.
-SK